The Exquisite Corpse Explored

A Collaborative Project undertaken by five Tucson Artists

The original exquisite corpse concept was formulated by DaDa writers and artists in the 1920’s using unrelated “fragments” of words or images to create new work. The New York Museum of Modern Art had an exhibit of exquisite corpses in 2018. Much of the work on exhibit came from those early writers and visual artists.


The Tucson Project

In the spring of 2018 six Tucson artists formed a study group to explore the exquisite corpse. Our goal was to  play” with themes and formats using images created by the group members to see what happened.

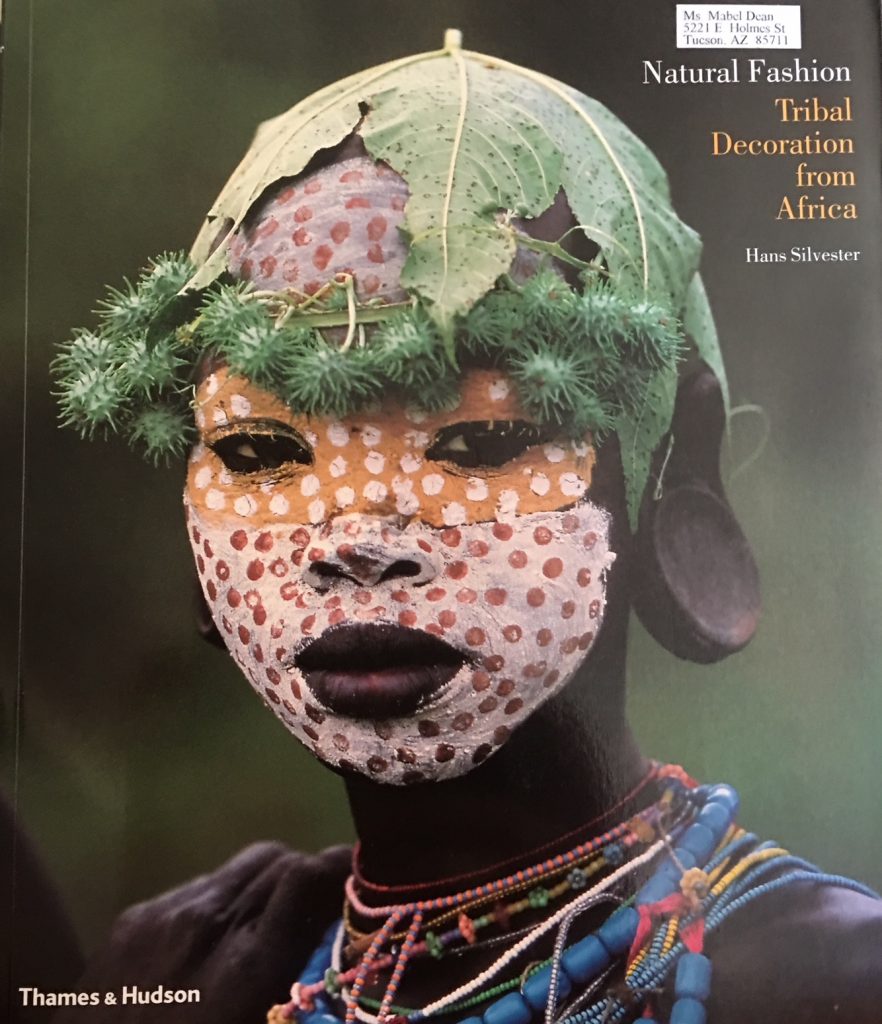
We started the project by creating by creating images that were 4.25 x 8.5” (half a sheet of standard copy paper). Each image had three segments and common “connecting points” so that there could be continuity. We met once a month from May through September. Each of us produced 4 unique images informed by basic themes agreed upon at our meetings. Our themes were: the human body, creatures found in nature, bodies with an ethnic theme and imaginary bodies inspired by technology.

Each month we would distribute color copies of our image to the group. By September our image banks included a total of 24 images. We shifted our focus to how we would present our images in a creative fashion. The traditional exquisite corpse books often utilized accordion spines or three-part pages. Our goal was to develop non-traditional ways of presenting the work. The finished pieces were shown at the October PaperWorks meeting.

The Participants

Elizabeth Brizard, Mabel Dean, Vicki Donkersley, Terry Enfield, Sherrie Posternak.
All are members of PaperWorks – the Sonoran Collective for Paper and Book Artists (www.paperworks.info ).

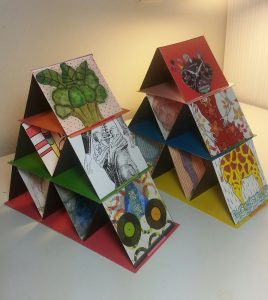
Elizabeth Brizard is a mixed media artist with a technology and teaching background. She has a unique capacity for thinking “outside the box”. She was inspired by her naturally playful nature and a spinning top known as a dreidel. Her exquisite corpse is a re-interpretation of the dreidel All of her cards are mounted and form a deck of cards calling for exploration. They can be attached to the dreidel. But they can also be assembled in unique “house-of-cards” structures.

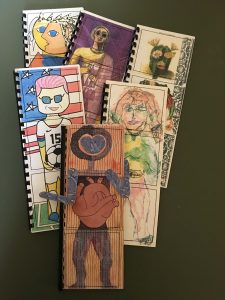
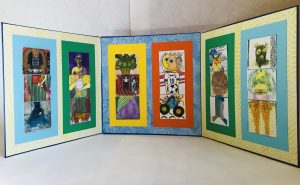
Mabel Dean is a mixed media artist who took on the challenge of using the images to create individual families from each artists’ illustrations. Her attempt to produce a vertical figure with movable segments was only semi successful. She was unable to provide enough stability to rotate the body parts on the stand.

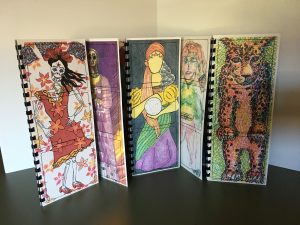
Her second attempt resulted in five stand-alone in books using the four images produced by the participating artist. Each booklet became a ‘family”. The body part pages are turned to create unique figures.

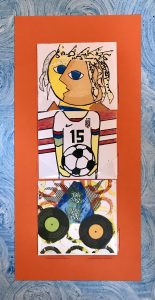
Vicki Donkersley known for her charming collage work approached the final challenge presentation by creating a game. She formed a triptych (three panels hinged together) to act as the game board. She reduced the size of the original artwork and cut them into 2” x 2” “game tiles”. Next she fabricated clear plastic corner “holders” on the card stock pages so the tiles can be easily inserted or removed, while being securely held in place as well.

The front and backs of the tiles feature different images so you can take out a tile, turn it over, and completely change the figure. When the tiles are moved around from figure to figure, they provide multiple variations, some are quite comical. Twenty-four tiles can be in use at a time.

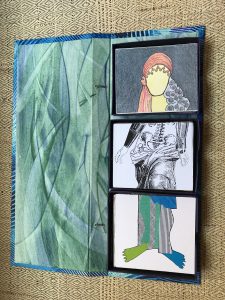
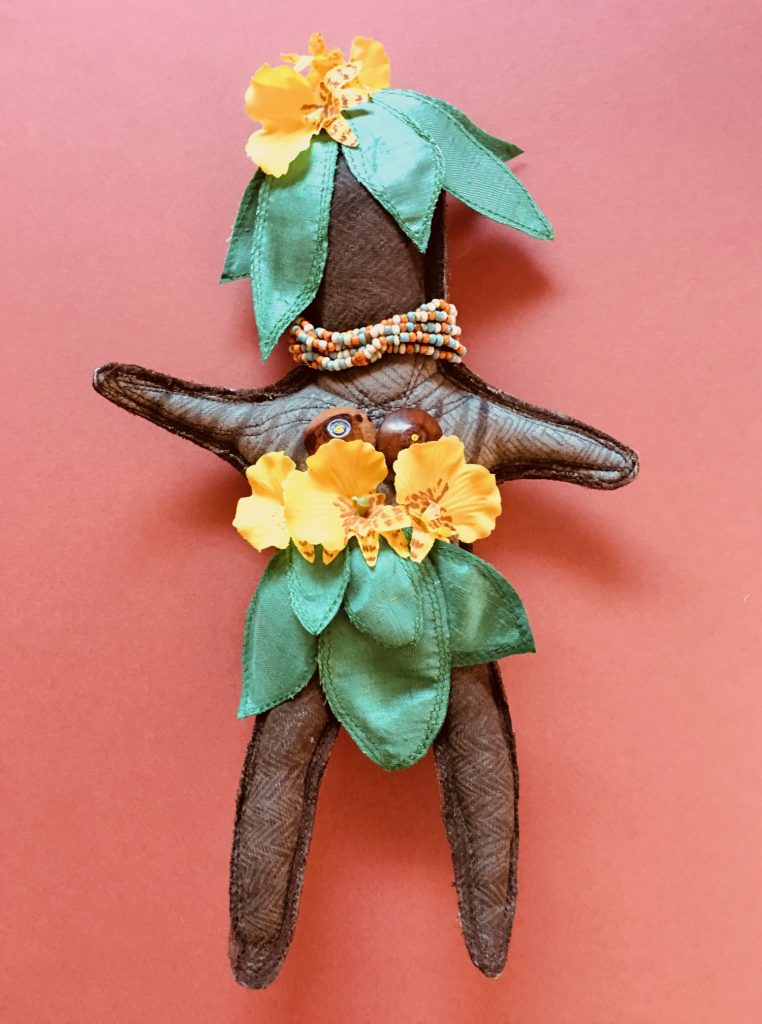
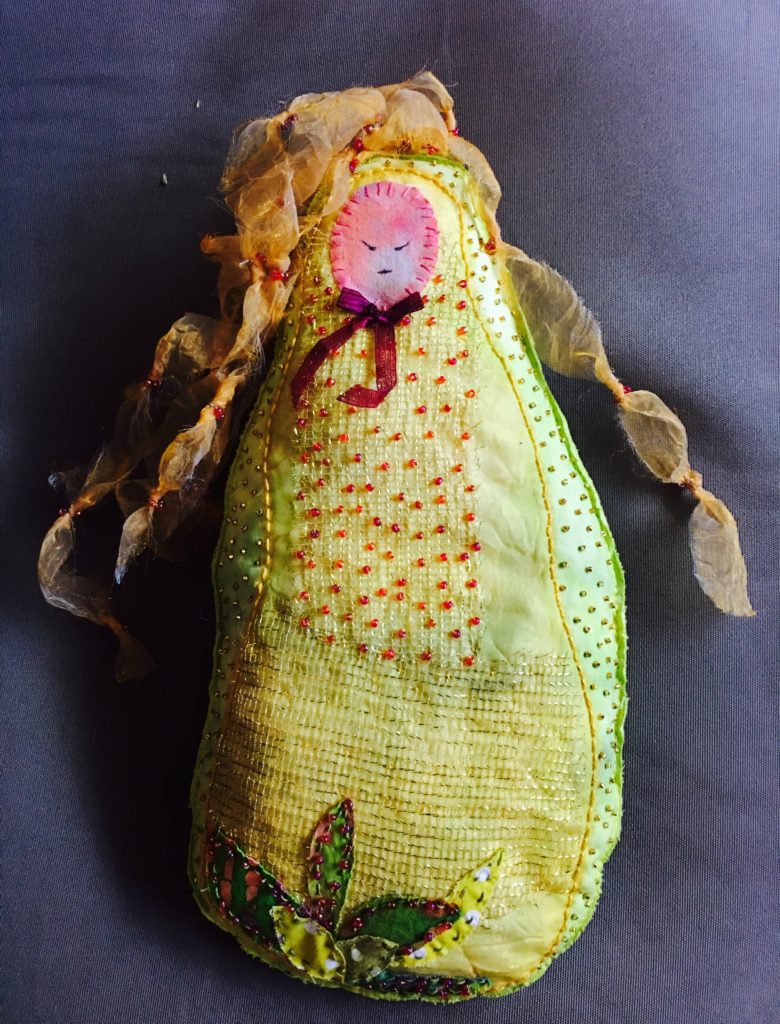
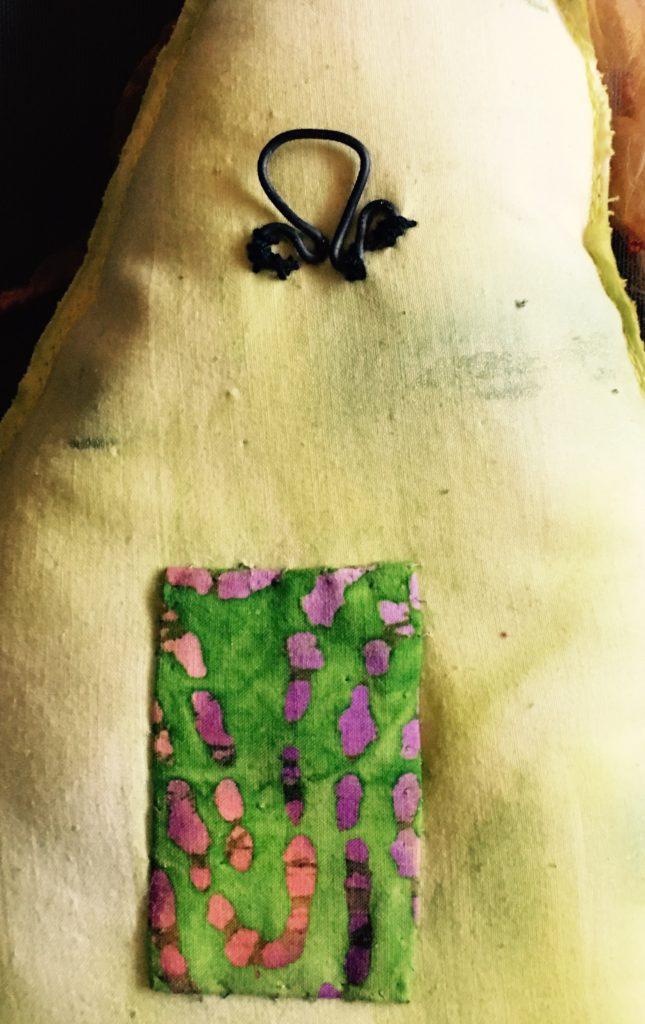
Terry Enfield was first recognized by the Tucson art community as a textile artist and doll maker. In recent years she has become known for her unique polymer clay and metal art jewelry. One could say she is a mixed media art explorer as she continues to study many different formats for creative expression.

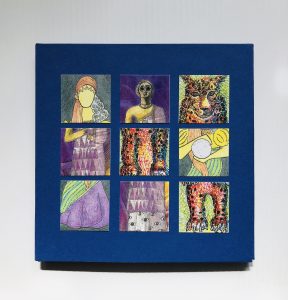
Her corpses were informed by her experience in working with form and stitch. She transformed her images into fine cards and made a custom three part box to display them. The three stacks of images represent the heads, torsos and legs of all 24 images. Body parts are easily rearranged. Her piece is a unique table-top invitation to touch and explore.

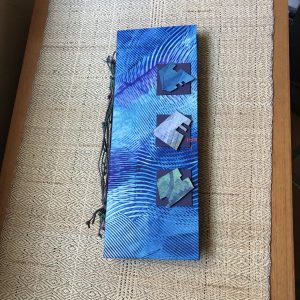
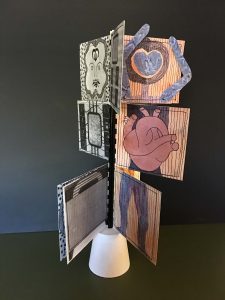
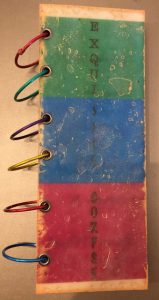
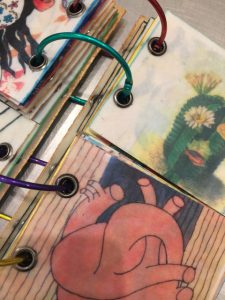
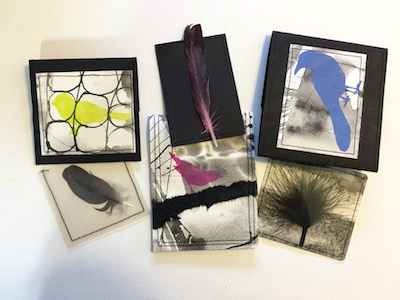
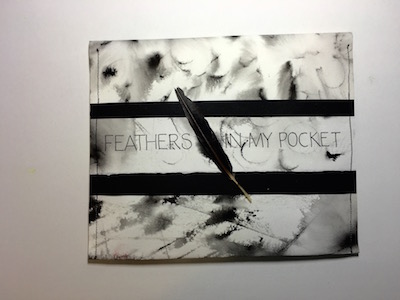
Sherrie Posternak Sherrie Posternak is well known for her encaustic and mixed media artwork. For this project she scanned each of the images and printed them on sumi paper. The images were mounted on a polyester/nylon spun fiber paper called Encaustiflex, using encaustic wax medium as the glue, saturating both the sumi and the Encaustiflex until each page became one complete unit. The covers are cotton quilt batting and sumi paper also saturated with encaustic medium. Bright binder rings hold the book together.

Reviving the Artist Within

For the past 8 years I have made a doll each September to commemorate my birthday. When September 19 arrived last fall, I once again went to my studio full of anticipation about what the doll would become. I gathered stuff to make her – fabrics, art papers, paints and pens along with assorted yarns, ribbons, and buttons and do-dads. I started out by painting small pieces of canvas skin tones and bright designs that could become clothing or arms and legs. I had the intention to assemble the doll after lunch when the fabrics had dried. But my “vibe” had changed and I discovered that at there was no in doll in my consciousness.

I was disappointed but figured she would emerge later in the week. So I packed up all the pieces and stored “her” on the unfinished project shelf. I felt disappointed and knew that I “owed” myself a birthday doll if I was going to keep up the tradition!

For the next 3 or 4 months, I would occasionally return to the tray and fondle the pieces with the hope that on that day, the doll inside me would speak up and take form. The holidays came and went and one day I looked at all that stuff on the tray just waiting to become the doll and decided that the time had come! No more delays! I had to get the doll finished!

I began with the painted canvas drew a face on it and cut out her head. Immediately she developed a persona and became the centerpiece for the doll. I found the right yarns and fabrics in my “stash” and by the end of the day she had emerged fully and completely!

I’m describing this process to illustrate the point that creativity is not easy. Getting started on a project can take forever!! I find it difficult to work on something unless I have a vision or an idea that I can pursue with enthusiasm.

I think one reason why I have produced so little finished work these past few years is because I’m out of practice and have let my creative juices dry up. I haven’t pushed myself to enter shows, or take on projects unless there is a specific reason to do so.

The other element of art-making for me is recognizing that I must be more patient with myself. It’s harder to start an art project if you haven’t been to the art table in months. Daily cutting, pasting, painting, drawing, printing keep all these skills at the front of your brain – ready to call upon when a particular challenge comes along. I have not been a daily art maker.

Recently I’ve been journaling about my lack of art production. It’s clear to me from all this soul searching that I benefit when I have some form of art-making as a daily practice. It makes me happy and I look forward to seeing what I discover each day during that time at the art table. The more I practice my art, the more likely I am to start and finish projects.

The quarantine is helping! For the past month I’ve been showing up at the art table most days. And my life has been much more enjoyable. I’ve spent time drawing and painting the flowers in my yard. I’ve started up this blog again. I’m having fun in the kitchen trying out new ideas. It seems like l that my muse has come back to entertain me.

I’d be interested in hearing from you about how you are motivating yourself to be creative and nurturing your inner artist.

“Imagination should be allowed a certain amount of time to browse around.”
Thomas Merton

Birthday Doll, A Good Book and a Unique Pickle to Make


Birthday Doll 2019
September brings the time of year when I create a simple doll to celebrate my birthday. I started her on my birthday, but with other demands, I just managed to finish her up over a month later! She is inspired by the Ethiopian Omo River Valley people who decorate their bodies with flowers for special occasions.

Many years ago a friend sent me a link to some video documenting this tradition. I was enchanted, and promptly bought a book of photographs done by . Recently I was looking at the book and decided to use it to inform this year’s doll. I also shared the video and book with a small group of art friends and several came up with their own body adornment also informed by the video and photographs.
https://hubpages.com/travel/The-amazing-body-art-of-the-Ethiopian-Omo-tribes

When I had finished her, I realized that she was a “black Madonna” goddess. Many ancient cultures worshiped a madonna with dark skin. Marion Woodman, a Jungian therapist, popularized the concept of the black madonna and wrote the following in her book“Coming Home to Myself”:

‘The Black Madonna is larger than life itself.
Nature impregnated by spirit,
She presides over fertility, sexuality, childbirth.
She accepts her body as chalice for spirit,
Presides over the sacredness of matter,
The meeting of sex and spirit.
Rejected by the patriarchy,
Her energy has smoldered for generations.
Now she erupts in us and in the world,
Demands conscious recognition,
Demands redemption of matter.’

She certainly is a concept of woman ripe for recognition in this day and age! In many subtle ways she represents the shadow side of my personality that is emerging as I live my life alone in the now.

The Book By My Chair:
This is a book suggested to me by my sangha friend, David Green. He had it with him one Sunday. I saw that it was filled with book marks and notations and commented about this. He replied it was an especially down-to-earth presentation of basic Buddhist meditation and self help exercises. Sounded interesting so I ordered it from Amazon.

The reward for doing this has been very special. It is a wonderful handbook for emotional self-care. If you are floundering in this area, do check it out at your local bookstore if there is one in your community. Or spring for it. At Amazon you can get the paperback version for $10.87 If you don’t find it helpful, you can always pass it on to someone you think needs it!! (HA!!! that’s my little flippant joke)

A New Kind of Pickle!
I love pickles and fermented foods. Always have! When I was a kid and couldn’t find anything tasty in the refrigerator, I’d settle for a finger-full of Gulden’s Mustard.

So, when my friend Terry Enfield told me about pickled cherries I could hardly wait to make some. And then I found a similar type of recipe for pickled grapes and made them too! They both are delicious as a garnish for an entree plate. And of course if you happen upon a jar in the refrigerator, they are perfect for a forbidden snack.

Here’s a recipe you can use for either:
1 cup apple cider vinegar
1/4 cup water
1 cup sugar
1 cinnamon stick
1/4 teaspoon cloves
1 teaspoon whole black peppercorns
1/2 – 1 teaspoon of any or all seeds in your pantry. (mustard, coriander, anise, allspice – depends on what you have.)
1/4 teaspoon (or more) red pepper flakes (depends on your taste. I like less)
1 pound of washed grapes or washed and pitted cherries
Place fruit in clean canning jar.
Add a sprig of fresh rosemary (if you have it)
Place the vinegar, water, sugar, cinnamon and the seeds and pepper flakes into a saucepan.
Bring to a boil, stirring to dissolve the sugar.
Lower heat and simmer for 5 minutes.
Pour the hot vinegar mixture (including seeds, stick etc) over the fruit.
When cool, refrigerate. Can be eaten after a day, but they taste better when they have marinated for at lease a week. Keep refrigerated.

A Final Comment

I’ve come to accept that I am an occasional blogger which means I don’t post very often. I keep thinking “next month I’ll have my act together to write up something really interesting, but my life doesn’t work that way any more. I post when I have time to write something I think is worth sharing which isn’t as often as I want. The life of an 80 year old person just isn’t as exciting as it was 20 years earlier. Finishing my birthday doll got me started again. The next post will come your way when my muse finds something that insists that it be shared. Until then, I remain in limbo searching for the next interesting “something” I can get excited about.

A Potpourri of Thoughts and Ideas

Here it is July, 2018 and this is my first post of the year because this year my art activities have been slim.  I’ve had nothing to write about.   But I’m coming back to “life” and enjoying new discoveries every week that I hope to share with you in the future.  My blog will have a broader focus drawing from my  encounters (recipes, books, movies, places, gadgets, art-making, programs,) – whatever I find interesting.  I hope you’ll find it worth the “read” as I know your time is precious and there are many ways to spend time on-line.

Potpourri
I looked up the definition for potpourri and when I read it, I thought this is just what I want my revisioned blog to be – a mixture of thoughts, ideas and actions.  So welcome to my journey.  I hope you decide to stay on for the ride.

Working On Depression
Depression has been my driver for the past two years and frankly I’m tired of it but it’s a hard demon to conquer and I seem to be one who can not tolerate the anti-depressant drugs offered by modern medicine.  As a result I’ve spent way too much time sitting in my chair with “poor me” thoughts or staring at the TV or an open book.  I don’t want to be an old lady “stuck” in a chair.  I want to be the “youngest” active and involved old lady you know!  

In March I decided to give up the chair.  The most important thing I started doing was writing morning pages every morning before the day got rolling.  I learned about morning pages from Julia Cameron in her book “The Artist’s Way” and I did them when I first moved to Arizona. I stopped doing them years ago but I never forgot how helpful they were whenever I lost my focus.


Morning Pages Are Transformative!
Every day I write three pages (two pages if they are college ruled!) of whatever comes to my mind.  When I begin I have no idea what will turn up on the page.  But what I do know is that when I am truly honest with myself helpful thoughts emerge.  I write about problems, disappointments, feelings, frustrations and progress. 

My pen reveals alternative solutions that I wouldn’t have thought of sitting alone in the chair.  Writing like that is like talking a problem over with a best friend but instead it’s me! The result is that my days have become brighter and interesting.  My life is becoming manageable and actionable. I look forward to starting the day!!!

If you are stuck inside your life, I encourage you to journal daily for several weeks.  See what happens.  You may find new ways of dealing with your problems and solutions you never thought of before.

Re-discovering Sketching and Watercolor
One of my art interests has been watercolor sketching.  Years ago when Ed and I traveled, I did watercolor journals to record our trips.  It’s been at least 8 years since I’ve done much sketching or painting.  I realized that wanted to “dive” back into sketch-booking.  

I’ve been especially inspired by Barbie, my sister who does amazing watercolor journals.  So, one of my new  goals is take taking on-line classes to develop my drawing and painting skills.  

Recently I’ve found YouTube to be a great source of free lessons and I’ve also started taking Craftsy art classes.  www.craftsy.com    I signed up for their “Unlimited” version  so I can take all the classes I want from their catalog for a full year.  They have 600+ classes to choose from!  Now I don’t have to wonder what to do with myself when I have free time.  

Right now I’m enjoying the Craftsy class offered by Marc Taro Holmes.  He is a well known Urban Sketcher and a very sharing person.  I subscribe to his blog. https://citizensketcher.com  The international Urban Sketching group has a monthly magazine “Drawing Attention” which I enjoy. Each month it features articles from sketch artists all over the world. https://Urbansketchers.org  It’s a good place to view many different styles of rendering with ink and watercolor.

The Joys of Cooking
One of my favorite activities is cooking.  I don’t do it every day, but I do cook several times a week and experiment with new recipes and food combinations.   When I discover a winner I like to share it with friends.  

Recently I had lunch with my friends John and Barbie.  They are both great cooks.  John fixed us broiled salmon and it was terrific!  This past week I tried his technique, and it was fast, easy and delicious!  Thank-you John!

John Nemo’s Broiled Salmon
Ingredients:
fillet of salmon (about a pound) — the thicker the better; preferably consistent in thickness if possible
olive oil
mayonnaise
chopped preserved lemon (about 2 Tbsp.)
Instructions:
Preheat the oven to 400.
While waiting for the oven to fully heat: prepare a flat baking pan or sheet by covering it with a piece of foil.  Lightly coat it with olive oil and sprinkle on a bit of coarse salt and pepper to add flavor and prevent sticking.
Place the salmon on the sheet with the skin side down 
Spoon or brush a thin to medium layer of mayonnaise on the top.  
Sprinkle with the preserved lemon.
Once the oven has reached temperature put the fish in the oven and and bake for 4 minutes.
Turn on the broiler.
Blast the fish under the broiler for two or three minute until the mayo bubbles.
The duration of broiling depends upon the thickness of the fish and your desired level of rare to well done eating of salmon.  I like it very tender so I do it for 1 minute!
Remove from the oven and let it sit for 2 to 10 minutes before serving.

Note if you don’t have preserved lemon use grated lemon rind in the mayo and maybe a some lemon juice for additional flavor. Don’t worry if the mayo and lemon ooze all over the foil on the baking sheet.

A Problem Solved! Garbage Bucket Cover
You never know what kind of creative solution lurks inside your head.  Morning pages to the rescue!!!

I have an under-counter slide-out rack for a garbage pail.  It’s very convenient and I use it many times a day.  But in the summer in the desert, it gets smelly.  One way of dealing with this is to take the garbage outside every day.  That means a daily trip to the dumpster with a mostly empty large trash bag. I can put the food waste in a counter-top container lined with a plastic bag and remove it.  That works but I don’t like the garbage on the counter where I see it.  I much prefer the under-counter solution BUT what to do about the odor.

I’ve found a solution!  I made a lid out of mat board with a duct tape handle.  Now the lid covers the container  and minimizes the smell no matter what’s in it.  When I need access, I simply slide and dump.  When it’s filled I remove the lid and tie up the bag and take it to the dumpster!!

Feedback Please
I’m already working on the next post, but I do welcome your feedback.  Is my new approach interesting? useful? What kinds of topics would you like me to write about?  What can I do to serve you, my audience better?  You can get back to me using the contact page.  I’d sure like to hear from you.

Share with Others
Putting this together always takes more time than I think it will.  This post consumed about 10 hours to plan, write, edit, take photos and proof.  I enjoy doing it, and I’d love to share it with a wider audience.  It would help if you could forward the link to friends who might also enjoy receiving it.

Thanks, in advance.
Love, maybelle

Starting the New Year

For over ten years on January 1st I have formed my personal intentions for the new year.  In keeping with this tradition this year one of my intentions is to post on my blog at least once a month. So here’s my January post just in time!

Living the single life

My life has changed a lot.  Now I am a “committee of one” – a role that I reluctantly have taken on.  It’s so much easier when there is someone present to be witness for each other and to share in decisions.   Ever since I read the book “The Life-changing Magic of Tidying Up” by Marie Kondo, I’ve been making an effort to simplify my life.  Part of this is driven by the aging process – I am being forced to simplify in order to cope with changes in my physical strength, stamina, memory and ability to focus.  I’ve discovered there are real benefits to slowing down and enjoying the moment.  Having too many choices can be immobilizing.  I’m doing things that make me happy whenever possible.   Big projects cause me stress and anxiety.  I’m finding that accomplishing little projects bring me great pleasure.

I made the decision to refocus my art-making on drawing and sketching, casual watercolor and stitching.  All of these activities offer potential for creative expression but are portable and don’t take up a lot of space. I’m no longer submitting my work for juried shows or taking intensive art classes that go on for days.  I’m limiting my travel to short trips of 3 or 4 days mainly to visit my sister.  And I’ve discovered on-line classes that I can take at my own pace.


Self Care

This refocus has allowed me to be more involved with taking  care of myself through exercise and good health practices.  I was pleasantly surprised to discover that even tho I live alone I enjoy putting time and effort into food preparation.  After Ed died, I expected that this would be a chore.  Instead it has become a creative adventure.  Recently I’ve started to ferment veggies to make my own probiotic foods. I’ve had fun developing original recipes that give me a sense of accomplishment and satisfaction.  I’ve started attending a regular Feldenkrais class that has helped my lower back become stronger.  I’m even getting a monthly facial- something I had never done before.  I’ve begun going to the movies by myself and enjoying it!!!  I plan to continue this blog but I expect to be writing more about my new life as an active and creative “crone”!!!  and sharing it with you.

An Encounter with the Flu

One of the big challenges this month was dealing with the flu. This was traumatic as I seldom get sick and Ed wasn’t here to take care of me!  For years I have gotten a flu shot and this year was no exception.  But the day after New Years I realized that I had the flu.  Granted it was a mild case but it kept me down for eleven days!  I discovered some interesting alternative treatments on-line that seemed to help moderate my symptoms.  I learned that oregano oil is both an antiviral and antibiotic!  Fortunately I had some on hand and so I put several drops on a spoonful of yogurtand gulped it down fast.   Ugh – tastes terrible but I did it for several days and feel that it knocked out that virus.   (Next time I’ll use oregano oil capsules.)

I developed an ugly chest cough which I treated with Ricola cough drops and Sambucus (elderberry syrup)  I drank camomile tea with ginger, honey, lemon and 3 fresh basil leaves.  Water was my best friend and my hydration goal was to drink a half cup every hour.  On the eleventh day I woke up without coughing so I pronounced myself cured and took a walk around the park to celebrate.  Just last week I read that golden kiwi fruit is being successfully used as a flu“treatment”.  There is documented evidence that if one eats three a day when they first have the flu symptoms the virus is killed within three days.

It’s too bad family doctors don’t offer these kinds of alternative treatments for colds and flu.  Of course I don’t know if my self-determined approach cured me,  but my on-line research alerted me to these alternatives, and I believe they prevented me from landing up in the hospital with pneumonia.  Three cheers for the internet.

On-line Classes

I’ve been taking a most enjoyable and interesting on-line class with Australian sketchbook artist, Liz Steele (www.sketchingnow.com).  Her training is as an architect, but her love of rendering has made her a highly regarded Urban Sketching Teacher.  She has developed unique and original approaches for sketchbooking.  I’m taking her newest class “Watercolor Sketching” and learning how to work fast and juicy!  I’ve had to “unlearn” some “bad” habits and I’m enjoying the results.  Here are two versions of an assignment she gave us – working juicy – one wet on wet and the other waiting for paint to dry before painting the adjacent areas. Each painting was done in about 5 minutes!   I’m only half-way through the class.  The first two weeks focused on painting skills and soon we will be adding drawing to the formula.

I’ve also enrolled in two on-line photography classes, which focus on developing skills using iPhone apps and working with digital photos to create composite art.  There are so many interesting classes one can find on the internet.  I  never got involved until I took a class this past year on creating mandalas as a spiritual practice.

Happy Making Activities

Kale and Garlic Soup

2 slices bacon, chopped

6 cloves garlic sliced (or grated)

4 – 5 cups finely chopped kale – no thick stems

1 quart of chicken broth (I like Costco’s brand)

Place bacon in a 2-3 quart saucepan and render the fat over low heat.

Add the garlic and cook gently (don’t brown)

Pour in the broth and add the kale.

Bring to a boil and lower the heat to simmer.

Cook 30 minutes or until the kale is nice and soft.

Fresh Flowers

When Ed was alive he often brought home fresh flowers.  I miss his little gifts of love, so in his honor I almost always have fresh flowers or a blooming plant on the dining table.  This is the orchid I got to celebrate his 80th birthday.  Every time I pass by it or glance across the room, it brightens my spirit and makes me smile.

I share all this with you as an example of one way of creating a solitary life with a positive focus rather than being enveloped by grief and melancholy.  Our lives are impermanent  so the gift we have each day is to live as fully as possible.

To be continued next month…….

Another Birthday…Another Doll

Some of you know that for the past 5 years I’ve made a doll to celebrate my birthday.  With Ed missing, it was not a day I was looking forward to at all.  I scheduled it fully so there wasn’t a lot of time to be alone.  I spent the morning in a meeting and took a class in the afternoon and went out for dinner to co-celebrate birthdays with friends.  Came home exhausted and went directly to bed.

I started the next day and decided to make a simple “stuffie” style doll with beaded embellishment.  As a “process” artist my projects evolve and I never know at the start what the finished result will be.  I selected percale for her form which I painted with diluted acrylics. While the fabric was drying I collected fabric scraps, bits of ribbon and beads.  These included batik quilting scraps, golden organza and scraps of a grid-like fabric, magenta ribbons (from my sister’s birthday gift packages) and gold, red, magenta and green beads.

I cut out four rectangular layers (3 percale and 1 thin white felt) for the dolls body.  After setting aside one layer for the back of the doll, I made a fabric sandwich (percale, white felt, percale) and basted the layers together.  Next I drew the doll shape on to the top layer which I then machine stitched in place.  My first embellishment was to tack the golden grid fabric on the body of the doll.  After fooling around with the golden organza I decided to use it for hair as I couldn’t find a good place for it on the doll’s body.  Next came beading, then the application of the leaf shapes on the bottom of the doll, more beads and finally a face which I painted on percale and then hand-stitched in place.

I didn’t have a clear vision for the hair, and I wanted to use the organza, so I started playing and voila!  I found I was accumulating strands of hair.  I knotted them and added beads and found I had created braid-like ropes!  When I pinned them into the top of the head they fell into a unique hairdo which seemed just right.

1016doll-1

I fashioned a hanger from some wire and sewed it on to the back reinforced with several layers of scrap percale.  I made a 1.5” slice vertically down the back for stuffing access.  Next I pinned the back on to the top layers and machine stitched the doll around the edges several times.  Using sharp scissors, I trimmed off the excess fabric leaving about 1/8” around the outside stitching.  On the back side I ran a thin bead of PVA over the stitching so it couldn’t unravel.  The final finish of the edges involved dipping my finger into diluted acrylic paint and rubbing the exposed raw edges.  I like the way that the green paint serves to further define the edge.

2016doll-2

I ended by tacking her hair in place on the body as it had a mind of it’s own, going in places I did not want it to land and covering  the slit on her back with a decorative patch.

Now, it’s time to dream up a new project. In the meantime, I trust you are happily involved with your own projects and it being October I’m guessing that your fall calendar is already filled to the brim.

Feathers In My Pocket…a unique piece of “hand art”!


Preface:

So what is “hand art”?  When I was trying to categorize this piece, I came up with the term because it is something you must hold and explore with your hands. Some people might call it an “artist’s book” but it really is different from a book in that it is a collection of small objects.  

I also consider my artists books to be hand art as are other small works that can be picked up and fondled such as fetishes, small dolls, all forms of cards, little quilts, and even jewelry.  I’m drawn to making these small pieces partly because I like working small and partly because I don’t have a lot of storage space for large sculpture and paintings.

I like pockets a lot.  They hold the necessities of life such as a tissues, shopping lists, found treasure such as a feathers, heart shaped stones, bits of rusted metal, and coins. In fact, when I shop for clothing I avoid buying pants and jackets that have no pockets. I especially like to create pockets out of fabric and paper and put surprises in them.

I often find myself picking up stray feathers when I take a walk.  Over the years I’ve accumulated many black, grey and white feathers that have survived living in my pockets. So, one day several years ago when I was looking at my feather collection, it occurred to me that it would be fun to make an art piece using feathers and pockets.  I started a project box for this idea and have been adding ideas, feathers and other related materials ever since.  I dedicated my September art retreat to working with the feathers and pockets.

I decided that since most of my found feathers were black, grey and white, I should create the pockets using papers of similar colors.  I started with Sumi ink and Velin Arches, my all-time favorite paper, and made marks that reminded me of feathers.  These papers became the raw material for the pockets.  For contrast I added black art papers and built a series of seven pockets in assorted sizes.  I made bird silhouette stencils  to embellish the covers.

Recently I have been using stitching in my projects.  So I turned to my sewing machine as the main tool for creating pockets.  Somehow glue just didn’t seem to be the proper medium for pocket construction.

I was particularly challenged when it came to inserting the feathers in the pockets.  I discovered that they were easily damaged and needed protection so they could be handled. This resulted in the development of yet more pockets to protect and preserve each feather inside its pocket.3feather

4featherOnce the pockets were finished and the feathers carefully placed inside I was faced with the challenge of how to make the group of pockets a cohesive art piece.  I placed them in a bird shaped basket I had found at a thrift store.  It didn’t quite work.  So my solution was yet one more pocket made from the sumi paper. I created a large pocket to contain the feathered pockets.  When you look inside, you are treated to the surprise – many little pockets to open and explore.
feather env.A final note:

I have many more feathers in my “project box” just waiting for pockets.  Time for another look at how they can be transformed into more hand art!!!!

A Special Kind of Art Retreat

This week Ed (my husband) and I are having an “art retreat week”. Since we have decided not to travel any more, we have been looking for some way of breaking our daily routines.  Both of us enjoy creative activities but we never have time for extended in-depth exploration.  Our busy schedules seem to interfere.

We came up with this idea last month as a way of traveling without having to leave Tucson!  Here’s how it works.  After breakfast we unplug the phone until after dinner, turn off the TV (I like noise in the background all the time) and limit our time on the computer to art-related searches and activities.

And every night for the entire week we go out for dinner!  We’ve discovered a lot of smaller family run restaurants with home-cooked foods that make us feel like we are in another country.  For example, last night we went to a sweet little Vietnamese place where the Pho is amazing. The night before Chicken Sharma and Lamb Kitta graced our plates. And this being Tucson, there are many small wonderful Mexican cantina type places.  So I guess you could say that we are eating our way around the world.

We start our retreat each morning at 8:15 a.m. with yoga stretches and a walk. Then we head off to our individual studios to focus on our projects. He’s very involved with photography, and this month I’m all over the place finishing up projects started months ago, taking an on-line class and catching up with my blogging.

For our September retreat I focused on a project called “Feathers in My Pocket”.  It’s an idea I’ve been waiting to develop for several years.  I’ll be posting more about it later this week. I find myself working on a wide spectrum of projects from artists’ books to painting to stitching and more.  Today my focus is taking photos and writing so this blog can be posted and shared with you.

Some of my current work "in process"

Some of my current work “in process”

This summer we both took a class at Santa Fe Workshops with Karen Divine, (www.karendivinephotography.com) an extraordinary artist who works with her iPhone photographs to develop unique composited work – all done on the iPhone desktop!  Ever since returning home Ed has been exploring the concepts he learned with her and is now working on a series using material he has shot in museums.  You’ll be able to see some of it at (www.zenfolio.com/eddddean) I don’t know just when they will be posted, but he promises it will be “soon’!!!

Ed in his "studio".

Ed in his “studio”.

Our “art retreat” idea has worked so well for both of us that we have decided to set aside the last week of each month for this type of “at-home” creative traveling.  We’ve discovered that it is a wonderful way to break our daily patterns, explore our creative thoughts and “travel” without having to go through the hassles of airport security or full days of stressful driving.

2015 Birthday Doll

For the past five years I have celebrated my birthday by making a doll.  My goal is to make the doll on the big day, but life seems to get in my way, so this year I decided to make it sometime during my birthday week.

This year my friend, Alix, came over the day before my birthday so we could work on dolls together. She had started one in a class years ago but never finished it and I had not yet started mine.  Because I am a process artist I usually work without any idea of what the finished product will be.  I let the project unfold from step to step.

I started by looking though my Pinterest art doll folder to fill my mind with a multitude of ideas.  When I started looking through fabrics I had thought I might draw a face on some unbleached muslin, but I found that I was drawn to several bright and shiny fabrics that did not lend themselves to drawing.  So I cut out two colorful circles, stitched them together. The head was born.  Next I stuffed them lightly and sewed on a bead face.

The rest of my process involved developing this sweet creature.  I created a long pyramid for her body, expecting that the wide part of the pyramid would become the shoulders of the doll.  I stitched and stuffed it and set it aside while I played with some yarns Alix shared from her stash.  Once the  dolls’s head was adorned with yarns and tied into pigtails I had a good sense of how I might finish her up by adding beads, arms and a sash.  When I put her together I inverted the pyramid so that the wide part became the base.

I finished the doll by adding a small drawstring bag.  All of my dolls except for the first one have bags or purses  in which I leave a note of some kind.  While I did not finish on my birthday, I did make it in about 8 hours, over a period of 5 days.  Now she hangs in my studio next to her four sisters.  Every time I look at her I smile.  I think she is telling me that my 79th year is going to be a lot of fun and filled with playful opportunities.

IMG_0523

“Spirit of the Desert” – an Encaustic Assemblage

In my studio I have a number of unfinished projects just waiting for the day they get moved to the top of my “to do” list.  I begin every summer with the intention of finishing all of them, but that hasn’t happened yet!  This summer “ Spirit of the Desert” made it to the top of my list and I am happy to say it is done!.

I started it over five years ago.  I had built a polymer clay head and finished it with acrylic paint, pearl powders and amber shellac.  I then torched it to bubble and move the shellac which resulted in very interesting the final surface.  But the project came to a halting stop when it came to deciding just how I was going to use it.  The head needed some kind of a base or body.  I knew I wanted it to sit among dessert detritus but none of  the cholla stems, wooden sticks, or unique rocks I had gathered suited the mood I was trying to create so I set everything aside for another year.  Every summer I would revisit the box containing the components and I’d start pondering the problem again all over again with little success.

Then last year I came up with the idea of creating my own base.  I used a can filled with gravel and covered it with “desert-like” texture.  At last I was moving forward!  I realized that the fragile plant materials that I wanted to use needed some form of treatment to preserve them.   I determined that encaustic made from amber beeswax and damar varnish would be an excellent solution, so I treated my collection of pods and leaves with the encaustic and set them aside.  Once again I was in a holding pattern waiting for my muse to divulge the next step.

My vision was to create a soulful image that conveyed the joy and wonder I feel here in the Sonoran desert.  When we first moved here from a lush northern California environment, I felt I was in strange terrain – dry, hot, prickly and mostly devoid of life.  Was I ever wrong!  I came to enjoy this desert that specializes in survivorship!  It’s hard to live here with so little water and so much heat, but desert creatures have accommodated with thick skins, hard covered seeds, shallow roots and special leaf structures to soak up the moisture when it’s available.  It’s a tribute to the adaptability of life on our planet!

This summer I discovered the project box in the back of my art closet and decided this was the year to get it finished!   It lived on my art table for several weeks while I arranged and re-arranged and adjusted the materials until finally, I was ready to commit to the final assembly.  With a little cheering from some of my art friends I present to you the finished “Spirit of the Desert”.

Naature boy