blog

Wild Sage Discoveries

Finding Inspiration

We just returned from a three week trip to Alaska and Vancouver, B.C. The scenery was simply beautiful and went on and on and on. Fairbanks was our starting point with our first major destination being Denali National Park. It was blanketed with snow providing a multitude of mountain vistas, each more beautiful than the previous one. Soon we’ll have a photo file up on Ed’s Zenfolio site.

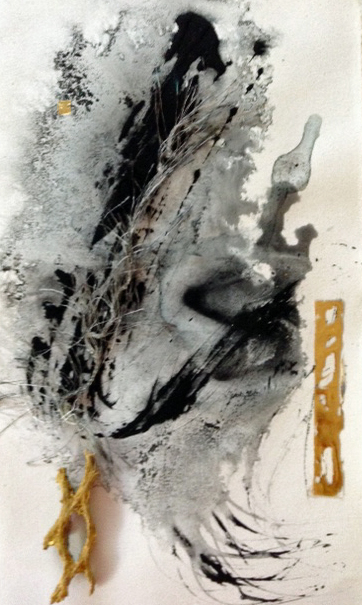
One of my favorite travel activities is looking for interesting local art. I use my camera as a notebook use the snaps to inspire creative juices. I’m working on some posts related to these. Maybe you’ll find a little gem to inspire you.

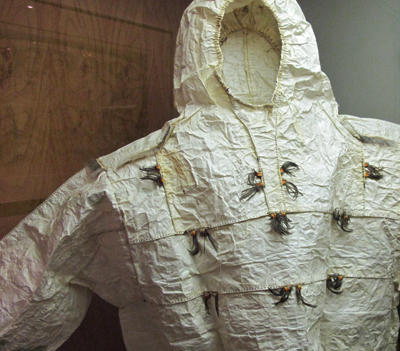
In Fairbanks we went to the “Museum of the North” where I discovered these wonderful items made from gut, skin and fur. I love this Inuit seal gut parka with it’s visible seams and bits of bone and fur? feathers? I ask myself could this be a starting point for a stitched paper project? Maybe I could make it from waxed paper. What if I applied encaustic to paper to give it a translucency.
Blogparka
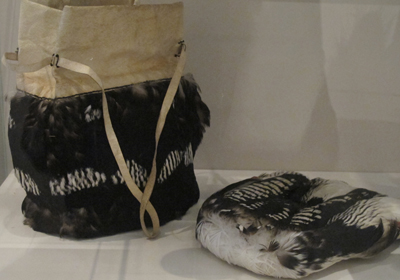
Those of you who know me well know that I love interesting bags. They are so practical for holding “stuff”. I love bags because I hang them off my body and my hands are still free. And by hanging stuff on me, I only have to make one trip from the car! I look at these bags and wonder about ways to make bags art pieces. This bag and hat? is made from loonskin and loon feathers? I never thought birds could be skinned!!! How might I use feathers (or maybe even papers cut like feathers) to embellish a bag? I don’t want to replicate this bag, but I’d love to create a piece that is “informed” by it.
blogloonskin
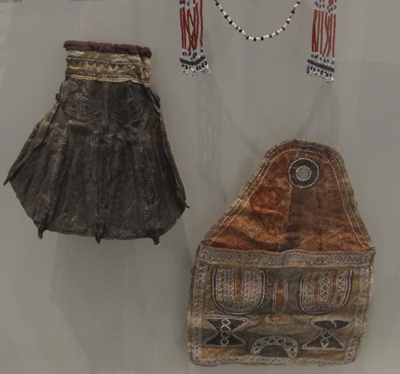
These two bags really caught my attention. The black bag is made from swan skin, gut and bird feet! Those Inuit’s find ways to use everything! I’m not so sure I could or would make a project with bird feet. But I’m thinking that maybe there are other natural materials here in the desert that could be applied to a painting or dimensional art piece. I do have a dried out lizard and a few brilliant green beetles! Cholla anyone? I really like the shapes of these two bags. Maybe I can build some similar bags using paper. Now how can I make paper more flexible. Many asian papers are very strong and can be sewed. Some papers become leather-like when they are coated with gesso. I could also bond paper to fabric (a la Jane Davies). The possibilities are endless.
blogtwopurses
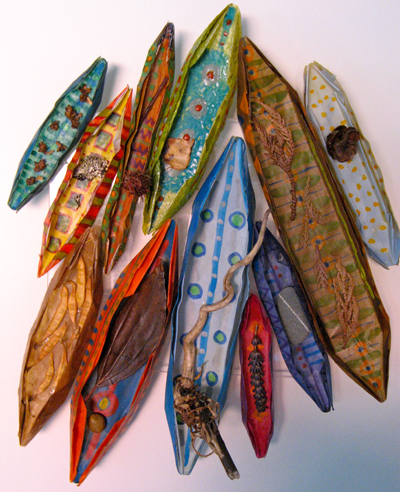
For some time I’ve thought about doing a series of bags and envelopes and maybe this summer is the time to explore that theme. The more I think about it, the more exciting it sounds.

I hope you find these photo notes as interesting and stimulating as I do. Maybe they will inspire a project you are working on. Let me know what you think and do send me a photo if you make something based on an idea provoked by this post.

More to come. Next I’ll post some small bone pieces that I think are beautiful.

Playing Around With Smoothies

Those of you that know me, know that my interests are all over the place!  I seem to “doodle-bug” here, there and everywhere!

I read on Facebook about the health value of honey and cinnamon.  In checking it out, I learned that there are a number of studies that confirm their medicinal and health contributions.  So I decided to find ways to get more honey and cinnamon into my daily diet. I realized that it would be very easy to use honey and cinnamon on my toast instead of butter.  Another good toast topper is coconut oil with cinnamon sprinkled on top.  I wondered how the honey would work as a sweetener in other things.

That very day I had some strawberries that needed to be used.  So I created a smoothie using about 1 cup sliced strawberries, 2 tablespoons honey, 1 teaspoon cinnamon and about a 1/3 cup of fruit juice.  What a yummy drink it is!   That blast of cinnamon makes it quite perky.  Since strawberries have been plentiful recently, I’ve made it a number of times since, and each time it tasted terrific.  smoothie

Speaking of smoothies, I’ve had a lot of fun making them with various fluids such as almond milk, coconut milk, coconut water, Trader Joe’s mango lemonade (delish!!!) and their Lemon Ginger Echinacea drink. I also have discovered acai juice which has a wonderful taste.  Since you only need a half cup or less in the smoothie, a $7 quart of juice can last through the week.

Another recent smoothie concoction included 1 cup blueberries, 1/2 cup spinach, 1/2 avocado, 1 cup yogurt, 1 tablespoon lemon juice and 1 cup acai juice.  It is about the best smoothie I ever made or tasted.  But it makes a lot,  You can adjust the recipe  downward and it would taste just fine. I think honey and cinnamon would be great in this drink.

If you want your smoothie to be extra creamy add half an avacado or a whole one if you want.  It changes the texture from beverage to creamy delight!  Sometimes it’s so thick I have to eat it with a spoon!

I like experimenting with a variety of fruit, juices and veggies in my smoothies.  A big handful of raw spinach goes a long way in pumping up the nutritive value.  I don’t have a juicer but if I did, you can be sure I’d add carrots, beets and other colorful and nutritious ingredients.  Sometimes I’ll add protein powders for extra value.  I like the ones available at Trader Joe’s – especially the chocolate one.

I’d be interesting in learning your favorite smoothie recipes and discoveries.  I make them several times a week for breakfast or lunch and am always interested in finding a new yummy one to add to my growing collection.


iPad Discoveries

Never loose your stylus again!

I love using my iPad and I prefer to use it with my stylus when I can find it.  The stylus is always at the bottom of my purse, in another room of the house or lost!  But that doesn’t happen any more and here’s why.  I made myself a stylus necklace that can be kept fastened to my iPad.

To make your own, you’ll need a stylus with a cord and a piece of elastic.  I put my stylus on a long cord (about 1 yard).  After attaching it to the stylus, I tied a knot about 1.5 inches away to keep the stylus from getting out of position. I made a second knot at the end of the cord so that it formed a stylus necklace.

Next I sewed an 19” piece of elastic into a circle with a one inch overlap.

Finally I looped the stylus on to the elastic so that it could not come off.  This can be worn around your neck when you are using the iPad.  Your stylus is handy when you want to use it.
Necklace

When you are all finished, just mount the elastic band around the iPad and wrap the stylus cord around and stick the stylus under the elastic band.  Everything is in place and ready for the next time you use the iPad.

case

Cord Storage – What to do with all the cords?

I found this idea on the internet and immediately went off to Target to get some hair clips.  I bought extras and gave them to my iPad buddies.  They bought more and gave extras to their iPad friends.  Isn’t life wonderful?

Cords

Bluetooth Keyboard

Not being very confident with my technology skills, I decided to take advantage of a class for iPod users being offered by John Nemo here in Tucson.  He our local “go-to guy” when we need help Apple products.  He has started several iPad study groups that meet regularly.  Each session starts with a q&a where John fields our questions.  Then he presents “how-to’s” designed to help us to get the most from our iPads.

It’s here I saw people using their bluetooth keyboards and decided that I might want this “toy”.  Wow, what a difference it makes when writing anything.  I love my new Logitec bluetooth which is available from Amazon for $75!  It makes typing a pleasure – especially if you want to do any kind of writing using an ap like “Pages”.  An I love the way it snaps in place as a cover for the iPad. If you are interested in John’s study groups you reach him at:  john.nemo@gmail.com

I hope you found this post helpful.  I must admit that I was very pleased with myself when I made these discoveries.


Tortured Metal Workshop

Recently I spent three stimulating days in a workshop sponsored by the Contemporary Artists of Southern Arizona ( www.casaaz.org ).  The workshop was taught by Victoria Pittman, an artist who splits her time between Gold Hill, Arizona and St. George, Maine! She is a world class calligrapher, accomplished artist and fine photographer.  ( www.victoriapittman.blogspot.com )

This class was entitled “Tortured Metal and Twisted Letters”.  Victoria is very experimental and often includes shiny metal effects in her work.  She has created an array of techniques that employ the use of acrylic paint, gesso, water soluble writing pens, metal leaf, metal foil, thin sheet brass and copper.

For three days we practiced using her techniques; applying the paint and metal to sturdy Stonehenge paper and altering the surfaces with texturing tools, heat, ammonia, vinegar and acrylic mediums.  She also had us experiment with metal, plant materials and ammonia to stain silk shibori style.  After “cooking” overnight,  we applied the silk with encaustic to boards.  We at the end of the class we used our papers, silk, and bits of metal to build beautiful small collage treasures.

I had great fun playing with these materials.  Here are snapshots of some of my experiments.

We used a small bundle of broom bristles to make marks with very black paint.  I embellished mine with grey threads, spots of real gold and a painted piece of dried cholla cactus.blogspotsofgold

Another mark was embellished with aluminum leaf that had been adhered to wire and sewn on to the paper.  A piece of red cord wound up provided an accent.blogredspiral

One of my favorite effects was made by squirting gesso on to the paper and left to dry.  This piece was painted with leafing size and then the leaf was applied.blograisedgold

A quick and simple way to create a wonderful effect is to draw around the gesso marks with a water-soluable pen and then wet the paper and watch the ink run.blogGesso

Very interesting effects were obtained by pouring ammonia on faux gold leaf and letting it “cook” to color the metal.  After the paper had dried, simple washes of acrylic added interest.blogleafpatina

I enjoyed layering colored tissues, paint and metal leaf.  Accented with hot foil touches made for very interesting papers.blogTissue2

Our final experiment involved staining silk and then applying encaustic.  I used copper and brass metal pieces treated with ammonia to create the focal point on top of the encaustic.blogencaustic

That’s all for now.  Have a great day.
Posted in Art

Managing Anxiety

It’s been quite a while since I’ve posted anything to this site. Weekends come and I promise myself that “I will post this weekend”, and then, before I know it, the weekend is over and I haven’t posted. I claim to myself that I have nothing to write about and that is partly true. I think the real reason I haven’t posted is that I’ve been preoccupied with other thoughts which have taken priority in my life.

blogOrchid

All my life I’ve been what I would call a “fear based” person. That has been both a gift and a burden. Whenever I undertake any kind of project be it a vacation trip, an art project, teaching a class, even writing a blog, I prepare for it. This often involves research to make sure I know what I should do, list-making to insure that I have what I need and that I don’t forget any vital steps, and rehearsals to make sure I really do know what I’m doing. That way I avoid mistakes and disaster.

I have been so good at being prepared, that I mostly experience fine outcomes. But the burden that comes with being so well prepared is that the “angst” and fear of coming up short has taken its toll on me. It has become my primary way of dealing with life. And it produces lots of anxiety and adrenaline!

When my husband recently had cancerous growth removed from his nose, I felt on the edge of disaster, like my world was coming to an end. Three or four times a day, I would feel a knot forming in my stomach. My heart rate was irregular. I couldn’t concentrate. What I was experiencing was extreme anxiety and I knew I needed to do something to alter this crazy-making response.

blogSt FrancisNormally I would turn first to my doctor. I had done that this past fall when I was having acute anxiety about turning 75 and a planned trip. He referred me to a wonderful hypnotherapist to learn self hypnosis. It was extremely helpful, and I broke the anxiety pattern for a while. I thought I had it licked and was most surprised that I had spiraled back into unmanageable panic – even with the self hypnosis.

This time I turned to my sister, a retired nurse paramedic and asked her how she worked with people who had PTSD after being in accidents. She got me started on this new journey, with a very effective 5 minute exercise that shifted the panic response with breath and visualization.

I immediately started using this approach each time the panic set in, and began to feel better. I realized I needed to learn more about anxiety. I’d like to share with you some of the very interesting books that I’ve been reading.

blogSagofernThe first book I purchased was “Fear” by Thick Nhat Hanh. It presents a Buddhist way of looking at and dealing with fear. It is easy to understand, and just reading it has brought me greater peace. Ed and I are reading it together out loud and I’ve found this experience has stimulated some great conversations where we both have come to know each other more deeply. I’ve found the practices and affirmations offered in the book to be very effective in lowering my anxiety levels.

I was talking about all of this with a friend who has spent the last year in treatment for breast cancer. She is a huge proponent of positive thinking and told me about the book “The Brain that Changes Itself” by Norman Doidge, M.D. It arrived from Amazon several days ago and I’ve devoured it. Through fascinating narratives about real people with challenging physical issues, Dr. Doidge explains how neuroscience is offering break-though treatments for all kinds of neurological disease. The chapter on fear described my situation to a “T”. The explanations presented the most current approaches to treating extreme anxiety and shed light on my problem. This has given me hope that I will be successful in managing my anxiety.

MothAnother friend told me of her experience with “HeartMath”, another view of dealing with emotional issues based on innovative research and the development of tools and techniques that work on anxiety, depression,hypertension, anger, stress etc.
She loaned me several publications which offer me yet another way of looking at my situation. The book “Transforming Anxiety” was particularly helpful, providing a sequential approach to developing new life-long practices.

What has been most fascinating has been the congruence in all three views with emphasis on the ways that breath and visualization can bring about long-term physical changes and a shift to normalcy.

I did make it outside a few times and took the photos included in this post at the Tucson Botanical Garden. It is a visual delight since spring has arrived and the next few months will offer visitors a botanical cacophony of color.

CupidSinkIn conclusion, I’m back and I think I’m ready to begin posting again on a regular basis. My goal – to post once a week. The desert is blooming again and, hopefully, so am I.

Valentines and Quilts

Now that we’ve got the blog working properly, I’ve not been very motivated to post.  And it’s mainly because I haven’t had any “wow’s” to write about.  I like to share with you the wonderful things I’ve discovered be it a new art process, a delicious recipe, or a great sight to behold.

Nothing like that has happened recently!  So I haven’t been inspired to write for you.  Who knows what I’ll discover tomorrow, and if it hits me big, you’ll be sure to hear about it.  Today I have written up a couple of little “finds” that have come my way.

Small paper and fabric quilt flag

Small paper and fabric quilt flag

Back in January Jane Davies came to Tucson and gave a “Paper Quilt” workshop for PaperWorks.  We printed on all kinds of papers with a Gelli Plate and then combined fabric and the printed papers to create sweet little collage quilts. I enjoyed the process and the results were satisfying.  They take a lot less time to make than regular quilts.  If you haven’t heard of Gelli Plates, do check them out on-line. www.gelliarts.com  They are a great monoprinting tool.

Gelli printed papers and scraps of fabric stitched and glued on to fabric.  Paper glued and wrapped on to the quilt to finish raw edges

Gelli printed papers and scraps of fabric stitched and glued on to fabric. Paper glued and wrapped on to the quilt to finish raw edges

Thursday, a small group of art friends met at Carolyn DuPont’s home and played around with alcohol inks.  I decided to use the inks to color valentines made with aluminum tape hearts.  I cut the heart shapes from mat board scraps, covered them with the aluminum tape and then drew designs on them with an embossing tool.  I dropped alcohol inks (Adirondack and Copic) to color the metal and then finished off with clear Krylon spray.  There are lots of instructions on-line for using alcohol inks.

Embossed metal hearts colored with alcohol inks.

Embossed metal hearts colored with alcohol inks.

Popsicle Pen

Quick and easy to make….

When I discover that I haven’t brought my calligraphy tools to a workshop and I want to make marks or write on a project, I make a pen. It only takes a few minutes and my workshop tool box usually has scissors, masking tape and popsicle sticks(aka paint stirrers).

Materials:

an empty soda can

a popsicle stick (or pencil)

scissors

masking tape

Be careful as aluminum is very sharp and makes a nasty cut.

l. Use scissors to cut off both round ends of the can.

2. Make a cut lengthwise through the metal tube.

1.Wheretocutblog

3. Fold one end of the can over about 1” and cut it off.

2.Foldingcanblog

4. Cut the folded strip in half. You’ll have two folded strips about 1” wide and 1.5” tall.

2.5cutstripblog_8236

5. Cut out the lower right corner opposite the fold leaving the folded can area about as wide as the popsicle stick.

3.Cuttingnotchblog

6. Insert the popsicle stick and tape it in place. Be sure the tape also adheres to the wood so the aluminum pen won’t fall off.

4.attachingpopsicleblog

7. Trim the nib into a pen shape.

5.3popsiclepensblog

Thats all folks! Your popsicle pen is ready for service.. Use it with almost any art fluid. Thicker fluids such as acrylic paint or tempera paint may require thinning with water. Experiment with pen angles to see what kinds of strokes you enjoy making most.

6.Popsiclemarksblog


Tohono Chul

Tohono Chul Park

a Tucson “Gem”

One of my very favorite places to go in Tucson is Tohono Chul Park. It’s a lovely nature preserve in the northwest sector of the city. There are gentle paths to follow, with a wide variety of Sonoran Desert plants well marked and interesting outdoor art along the way. I always enjoy going there to sketch or to meet a friend for lunch at their bistro and I usually take a little time to browse in one of their two gift shops.

My favorite place in the park is their art gallery where they have a number of shows each year. Most have a theme related to nature and the southwest. They have just mounted a new exhibit “Paper: From All Sides”. The grand opening is January 24 at 5:30 and the show promises to give us some unique insights into the ways artists use paper.

I am very honored to have one of my recent pieces, “Daniella’s Fleet” included in the exhibit. If you are going to be in Tucson this time of year, do stop by and check out the show. It will be open through April 21.

daniellafleet1blog “Daniella’s Fleet” is an unconventional nature journal made from encaustic covered origami sampans made from assorted scrap papers. The sampans contain objects found outdoors on Whidbey Island.

Several years ago I studied with Daniella Wolff on Whidbey Island. She had started making origami sampans and showed me how to fold them. When I got home I made many little boats and painted them in bright colors with gouache. The rainbow fleet made me smile. I had no intention of using them as an art piece. I thought they would make fun little gifts for friends.

While I was on Whidbey Island, I assembled a little bag of “findings” that I had gathered on daily walks along the beaches and wooded paths on the island. I thought about doing a nature journal using the found objects as inspiration. And then I realized that the lovely little objects belonged in the boats and the fleet of paper boats would make a unique journal! Since Daniella is an encaustic artist, and I had studied encaustic art with her, it seemed appropriate to use encaustic to encase and preserve the work.

But I still had a problem. I was at a loss about how to frame this funky little fleet. I tried making a river, a lake and an ocean but on each background the boats seemed out of place. So I set everything aside and hoped that some day I’d find a solution.

Recently I realized that the fleet didn’t need a background or a frame. It had it’s unique identity as a dimensional object. It could be displayed as sculpture or an artists’ book – not a framed painting. And so I mounted “Daniella’s Fleet” on transparent plexi. Now the fleet can sit on a table top or hang on the wall!

Holiday Wrap

Supplies

– waterproof surface

– paint brush (1 or 2” chip brush is fine)

– cottage cheese container (or equivalent)

– white glue mixed with water (50-50)

– papers

acrylic paints and inks

– spray bottle

brayer (optional)

Note: lightweight papers such as rice paper, tissue papers, and deli wrap work best when mounted on heavier papers such as copier paper, brown paper bags, shelf paper, newspaper etc.


Two Layered Paper

You will be creating two layered paper from a base paper, and a topper. For the top layer, use a piece of lightweight paper (deli wrap, tissue paper etc.) and crumple it into a ball and then uncrumple it. Do this ten times to break the paper’s fibers and create lots of creases. I use copier paper for a top layer because it crumples nicely and gives a good effect.

Next take the base paper and paint the glue mixture on it. Then apply the crumpled paper spreading it flat but preserving the wrinkles. The brayer helps here. You could also use a bottle or rolling pin to bond the two layers.

At this point apply a thin coat of paint or ink right on top of the crumpled sheet or you can wait until it has dried. The water on the surface will further dilute the paint. If you wait until the paper has dried, you may want to mist the paper before painting. Experiment to see what works best for you.

Let the paper dry. These make great gift wrap, cards, and book covers.


One Layer Paper

Use a spray bottle to wet heavier papers. This helps you to wad it into a ball. Crumple and uncrumple the paper ball ten times. Lay the paper flat on your waterproof surface and paint on the color. Let dry.

HolidayWrap_8229

This is a single layer of a recycled brown paper bag from Trader Joe’s. After wrinkling, I spritzed the paper and painted an underlayer of dark blue. When it dried, I added a layer of gold acrylic paint that had been thinned. Makes for a nice gift wrap.

If I were using tissue – I would create two layers because the tissue is so fragile. I would put the tissue on top of newspaper or some other paper that has a little weight to it and won’t fall apart when it gets wet.


Orange for the Thanksgiving Table

Some tasty food ideas for you….

In our home on Thanksgiving some form of orange always appears on the table or during the meal.  Usually there is a centerpiece made of yellow, orange and rust colored chrysanthemums.  And almost always there’s either a casserole or dessert made with some form of orange vegetable:  rutabaga, sweet potato, yam, butternut squash, carrot or pumpkin!

Rutabaga
My dad had a fondness for mashed and buttered rutabaga and he loved Mom’s pumpkin pie.  She always used the recipe on the Libby’s canned pumpkin label.  I like that recipe too, but I add more spice and bake it in a casserole dish instead of a pie shell.

Butternut Squash
I’ve always had a special  place in my heart for butternut squash.  I love it plain, or in soups.  One of my favorite salads is a combination of cooked butternut cubes marinated in a flavorful vinaigrette and tossed with fresh sliced strawberries just before serving!

Ruby Yams
In recent years I have discovered the ruby yam.  A quick and delicious way to fix it, is to peel and slice it lengthwise into 8 long wedges.  Toss it in a bowl with some good olive oil and sea salt.  Place on a foil-lined sheet and roast at 425 for 20-30 minutes or until it is cooked and slightly browned.  Let them cool and serve as an appetizer with a dipping sauce.  I like to use ranch dressing when I don’t have time to whip up a sauce.

This year our Thanksgiving meal included a yummy casserole made with mashed ruby yams and a pecan streusel topping.  You can serve it with the meal (use less sugar) or as a dessert or pie filling.Here’s the recipe.

Mix together and place in a casserole dish or pie shell:
3 cups mashed yams
1 cup brown sugar (use 1/2 cup if a main dish)
2 beaten eggs
1 teaspoon vanilla
1/2 cup milk
1/2 cup melted butter

Mix together and sprinkle over the top:
1/2 cup brown sugar
1/3 cup flour
1/3 cup melted butter
1 cup chopped pecans. (for more flavor, roast the pecans in the oven before)
Bake at 350 for 30-40 minutes until hot and browned.

I think you could substitute pumpkin, sweet potato or butternut squash for the yams in this casserole

Let me know of your success with any of these recipes.  Or if you have a special yellow veggie dish, send me the recipe.  I’d love to try it.

You can e-mail me at:

maybelle@wildsagepress.com

Thanksgiving Flowers
Rosemary and Mums